Minimum Effective Podcast Editing: The MEE Podcasting Method™
We’ve run a lot of surveys over the years here at The Podcast Host. The opportunity to find out the biggest struggles thousands of aspiring and early-stage podcasters face gives us the best chance of serving them, after all.
One thing that’s been a constant pain point for our audience over the past decade is editing and production. People don’t start a podcast because they want to become audio engineers, after all. Editing and production is simply a means to an end. And for many, it’s a significant barrier.
That’s actually why we designed and built our ‘Podcast Maker’ tool Alitu – to make podcast editing and production as simple as humanly possible. But the aim of this Minimum Effective Podcast Editing guide is to help you regardless of which tool you use to do the job. Let’s kick off by answering one of the most frequently asked questions:
What Editing SHOULD I be Doing in My Podcast?
This is something that comes up again and again: how much editing, and what type of editing do I need to do? What processes, what effects, what… torture… do I need to apply to my audio to make it sing like the voice of a lark after the best day of his avian life?
Ok, here’s the key:
Do only as much editing as you need to NOT sound like a total berk.
I’m going to call this the Minimum Effective Podcast Editing approach, with thanks to Tim Ferriss and his minimum effective dose.
I know that a lot of people are going to disagree with this. I hear you shouting:
“Spend huge amounts of time to create top quality content and the rewards will come.”
“Put in the effort to polish everything you do and your audience with pay you back in spades.”
Well, I don’t disagree exactly, but I think the time and effort above should go into your content, and not your editing. That’s one reason why, if you’ve got the budget, it’s a great idea to outsource your editing! If you DO do it yourself, though, it means you should only do just enough so you’re not pissing off your listeners, and no more. They’ll appreciate the time you spend coming up with great material much much more.
And here’s the big reason you should stick to MEE:
If you don’t stick to MEE, it’s likely you’ll stop enjoying your podcast, or you’ll stop podcasting.
This isn’t the case for everyone, of course. There are plenty of people out there who enjoy production and editing. But for the majority of us, editing is a chore. If you set your standards too high at the start, you just won’t sustain it. It’ll suck the life out of your podcasting, and you simply won’t have time to do it on a regular basis.
On the other hand, stick to MEE™, take as little time as you can to get out a decent product, and you can keep doing it, week after week, growing your audience exponentially as you go.
Following the MEE Podcasting Method
So, what does this Minimum Effective Podcast Editing look like in reality?
Well, here’s the basic method:
Step 1
Record your Vocals. Don’t stop for mistakes, just laugh about them, quickly correct yourself, and continue. DO NOT STOP RECORDING.
Step 2
Bring the vocals into your podcast software (e.g. Audacity or Alitu), and top and tail it. This just means chopping off the silence at the start and the end.
Step 3
Amplify the audio to -2db peak amplitude (easy peasy in Audacity – just select your audio track, hit Effect > Amplify, type -2 into the New Peak amplitude field, and Go!). Volume levelling all happens for you automatically if you use Alitu.
Step 4
Export and publish!
That’s it – for your first five episodes, that’s all you need to be doing. Forget about music, forget about editing out mistakes. Be authentic and let it all hang out. Certainly, and most importantly, don’t worry about your Ums and Ahs. It’s practice you need to sort those out, not editing.
With that said, Alitu can now remove every uhm, ah, awkward silence, and annoying breath sound for you, automatically!)
What About Those Big Mistakes?
Okay, okay, I can talk about being authentic, but sometimes I just plain mess something up and say completely the wrong thing. Here’s how you edit that quickly and easily.
When I realise I’ve said something wrong, or I flub my words, I follow these steps:
- Stop and pause for a few seconds
- I click my tongue right into the microphone three times (you can also clap three times if you prefer)
- I pause another few seconds
- I then start again, trying to use the same phrasing I used to start the segment earlier; essentially, the last thing that I said that was OK to broadcast.
- And then I continue on. At no point do I stop recording, so this is all in one audio file.
What this means is that when I get to editing, the first thing I do after importing my vocals is to zoom in and scroll along to the right. It’s immediately obvious when I hit one of these mistakes; the sound wave drops to silence, then there are three lines, the full height of the editing window. I’ve included an image below to demonstrate.
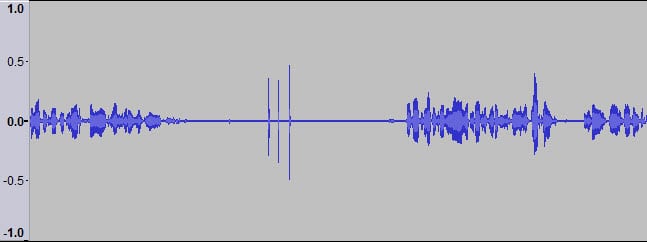
Then, I’ll move the playhead to the audio right after the clicks. I listen to how it starts, and then I go back, and I find that similar place before the clicks. I click in the silence just before that point, highlight right up to before the audio section after the clicks, and delete. Mistake gone.
In a 15-minute episode, I might make up to five or six of these mistakes, and it’ll normally take me just a few minutes to scroll through and delete them. Try it, it’ll change your editing life!
Moving Slightly Beyond the Minimum Effective Podcast Editing: MEE-2
So, once you’re a little more established, it starts to become worth adding just a little more polish. At this stage, you’ll have a good audience, because your content is gripping, amazing, mind-blowing, from all that time you’ve saved in editing and spent on thinking instead.
Now, you’ve a chance to make something of this podcast, and so, polish becomes more justifiable.
But… I still stick to the above state – enough to make you NOT sound a total berk. It’s just that, with a larger audience and a bit more prominence, sounding like a total berk becomes a little easier.
Slightly variable audio quality and a complete lack of music and FX is almost expected of those starting out, but if you’re becoming a little net-famous, THAT makes you sound a little like a berk.
So, here’s the 2nd level MEE, and this is what I did on the majority of my shows back when I used Audacity:
Editor’s Note
This process is all much easier (and, in many cases, automatic) with Alitu, but understandably, you might opt for Audacity because it’s free. There are also lots of other great podcast editing software options on the market, too!
Step 1
Take my script and record the vocals, including intro, content and end bits, inside Audacity.
Step 2
“Top and tail” – chop off the silence at the start and end.
Step 3
Follow the mistakes editing process outlined above – find the triple clicks and cut ’em out.
Step 4
Amplify the volume to a standard level – again -2db peak amp.
Step 5
Apply light Noise Reduction and Compression in Audacity.
Step 6
Import my theme music and transition clips.
Step 7
Use the shift tool to move the music and transitions into the right place, overlapping a little with vocals.
Step 8
Export the MP3 and publish!
Remember, this is a much more straightforward and automatic process with Alitu, and you can test it out for yourself, free of charge, to find out for yourself!
That’s it. I do minimal editing on the content. I keep it pretty authentic, forgetting about the little mistakes when I was speaking, which I just apologised for and corrected at the time. This has perhaps one more step if I’m interviewing someone: I’ll import the interview audio, top and tail that as well, and arrange the music and transitions around that. But really, it’s just as simple.
How Long Should the Minimum Effective Podcast Editing Method Take?
During the creation of one of our early Podcraft seasons, I kept a really detailed log of how long everything took. It was a bit of an experiment in daily podcasting where I released an episode a day for a full month. So, I had to stick to MEE™, or I wasn’t going to make it through the month – there simply wasn’t enough time in the day.
Each of my 20 episodes was around 10 to 15 minutes long, and here’s how it broke down on average:
- Planning – writing up a bullet point script and research as needed – 30 minutes
- Recording – turning on kit, checking levels, etc, and recording a 15-minute episode – 25 minutes
- Editing – following the MEE-2 sequence above – 5 to 10 minutes, depending on number of ‘triple click’ mistakes.
Of course, I’ve done a fair few of these, so I’ve got reasonably quick (although I’m sure I could be quicker!), but there’s no reason you should need to take much longer. And you’ll be surprised how quickly you can get if you refine your process like this and only do what you have to.
More Minimum Effective Editing Techniques
By this point, you’re armed with enough info to go and make a quality podcast that you can actually sustain and stick at.
But, there are even more tools you can add to your podcast superhero utility belt if you want to become an efficiency machine.
Until now, we’ve largely focused on Audacity because it’s free. I mentioned at the start, though, that we built ‘Podcast Maker’ tool Alitu to make editing and production as quick and as simple as humanly possible. Then, we added a whole suite of other features for podcasters, too. You can publish directly to Apple Podcasts, Spotify, and all other podcast platforms, from directly within Alitu, for example.
Sticking with production, though, here are a couple of ways to shave hours off even the most detailed and thorough of editing jobs…
Automatically Remove Filler Words, Silences, & Breath Sounds
At the touch of a button, Alitu can remove every uhm, ah, annoying breath sound, and overly long pause from your recording. These are clearly marked, so you can still listen through (at double speed; see below) and make sure they all sound good to your ear. If there are any that sound a bit too jarring, you can quickly and easily undo them.
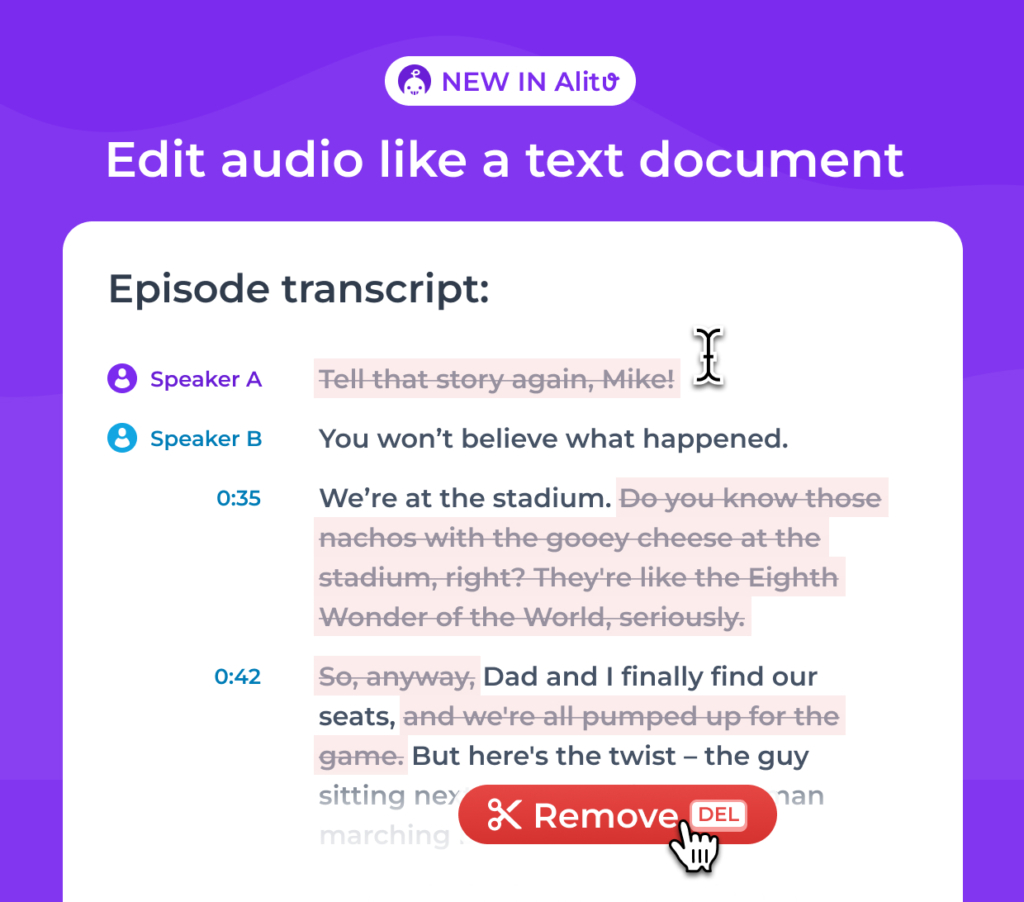
Editing Your Podcast Via Text
Alitu automatically generates transcripts of your audio, and you can use these to make cuts and edits. You simply select and delete unwanted text, and that removes these sections from the corresponding audio. It’s like magic!
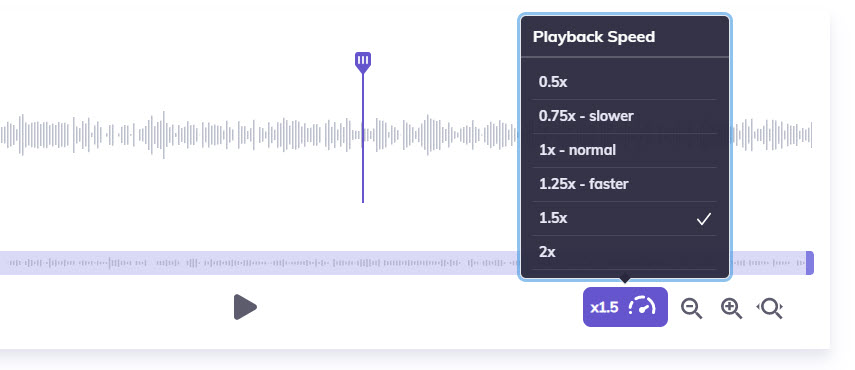
Editing at Double-Speed
What if you’ve got a lengthy audio file and need to listen through it to find and make any edits? Alitu is a great option here because of its Playback Speed setting. You can now listen through recordings in their entirety, making edits along the way, in up to half the time.
It’s worth noting that you can do this in Audacity, too. So if you’re not fussed about text-based editing, and are happy to buy your hosting and call recording elsewhere, then that’ll work for you just fine!
Looking for More Editing Efficiency Help?
So, that’s my Minimum Effective Editing process for podcasting, and what I recommend if you want to do it all yourself.
If you can afford to have someone else do it for you, though, that can give you more time to concentrate on refining your content. Check out how much it costs to outsource podcast production.
A final note on Alitu, though, it really can eliminate the need to outsource, even if you’ve no interest in learning about editing or spending any real time doing it. Remember, you can try it out, free for seven days, and see for yourself. You’ll be amazed at how much time (and money!) it can save you.