How to Convert WAV to MP3: the Why, the Jargon, & the Pitfalls
The MP3 format has been around for decades, but do you really know how to get the best usage out of it? You might know that it makes audio files smaller, much like how a zip makes file sizes smaller for sharing. But did you know there are other audio compression formats? What about conversion settings? It’s important to know these little details to get the best results – after all, you went through all the trouble of producing audio. You don’t want to inadvertently distribute your hard work in a degraded state!
In this article, I will:
- Describe when and why you may need to convert from WAV to MP3
- How to convert from WAV to MP3
- Demystify terms related to file compression
Why Do We Use MP3?
Most DAWs are automatically writing an uncompressed audio file as you record. This is the wave format (WAV). When we convert to MP3 upon exporting audio, file compression is applied to the WAV file.
In the podcasting world, podcast hosting companies charge monthly plans that are usually based on bandwidth uploads per month. This means you have a set amount of file space per month you can upload based on your chosen plan. Thus, the smaller the file, the cheaper the hosting costs for RSS distribution will be. MP3 is also the most widely recognized format by the general public. Lastly, people generally care more about storage space than audio fidelity, especially as more devices have removed storage expansion options.
How to Convert WAV to MP3
There are many recording software out there that can convert WAV to MP3. They work similarly, so if you follow these steps, it should overlap with your recording software of choice:
- Select all the audio you want to convert to MP3
- Click on File and look for either Export, Render, or Bounce (these all mean the same thing)
- Find MP3 in a list of supported file formats
- Choose your desired bit rate (for just spoken word shows, 96kbps CRB is a recommendation on some sites or 256kbps or higher if the show contains sound effects and music)
- Choose the slowest convert speed if your software has that option
- Click Export (or however your software words it to confirm) and start the conversion and export process. It usually is a button in the bottom right of an export window
How to Convert WAV to MP3 via iZotope RX
As a DIY podcaster, you may have some version of iZotope RX such as Elements. If you’re new to podcasting, you can take a gander at RX for the DIY Podcaster. The RX standalone editor can convert to every common audio compression format. It’s fairly easy to use with a simple UI, as seen below.
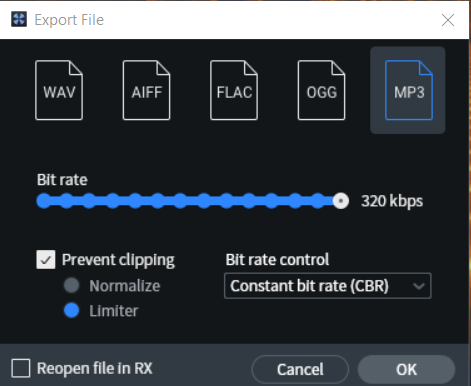
You’ll notice there’s a checkbox to prevent clipping using a limiter or normalization. Sometimes, during the conversion process, peaks will clip where they previously weren’t in the uncompressed file. Personally, I prefer using the limiter option over normalization. Normalization can affect your LUFS level, so you could potentially become louder or quieter than what you mixed for.
If some of the terms above are confusing, or you’d like to learn more about what goes into converting WAV to MP3, read on!
Can I Convert MP3 to WAV?
Converting from MP3 to WAV has no benefits. You can’t gain information back that has been lost. If you convert from MP3 to MP3 several times, each instance will compress the audio file further. This results in more loss of vital information that affects audio quality. It’s important to only convert to MP3 for the final file used for distribution.
What is Audio File Compression?
Simply, it is the process of making the file size smaller for audio via a codec. The codec used will determine how your computer/software calculates the math used to achieve this.
There are two types of audio compression methods:
- Lossless
- Lossy
Lossless, as you may have guessed from the name, makes calculations to keep vital bit information while shrinking file size. In contrast, lossy formats aren’t so delicate with the file compression of data, which leads to information loss and can affect audio fidelity.
Common Types of Audio Compression Formats
MP3 (lossy): the most popular format for its ability to significantly decrease file size.
Ogg Vorbis (lossy): this utilizes a variable bit rate conversion (I’ll get to that in a bit). Generally, on paper anyway, it is more transparent with its compression than MP3 but enjoys similar file shrinkage.
FLAC (lossless): Stands for Free Lossless Audio Codec. Probably the most transparent audio compression format since it utilizes lossless algorithms while getting the benefit of file shrinkage. However, file sizes will most likely still be larger than MP3 or Ogg Vorbis since more information remains intact.
Since MP3 is the most common and supported format for podcasting and other audio-related distribution platforms, I’ll focus on its other nitty-gritty details.
Common Terms When Converting WAV to MP3
Some people work at 48kHz or higher, and there are benefits to doing so. If you do this, you’ll want to convert to 44.1kHz for the final mix. 48kHz and 44.1kHz are what’s known as sample rates.
Sample Rate: Affects the playback speed while working in a DAW. If you change sample rates in your DAW but don’t convert the audio’s sample rate, you’ll either end up with sound higher or lower pitched, depending on which way you go. However, MP3 conversion going from 48kHz to 44.1kHz means you go from 48,000 samples per second to 44,100 samples per second. This means less data. Less data means smaller file size. Here’s our full guide to podcast sample rates.
It’s worth noting, too, that, just like trying to convert MP3 to WAV, converting from a lower sample rate and bit depth will not receive the benefits of the higher numbers. These must be used during the recording process. You can always downsample, but you cannot upsample, as this information is not captured. Upsampling will only ensure your audio plays back at the correct speed.
Bit Depth: The word size of samples in digital audio. The more bits used at recording, the higher the audio fidelity and the larger the file size. For example, it’s common to record at 24-bit, but now we’re entering the 32-bit era. However, we use a process called dithering to cleanly convert to 16-bit for distribution. Why? Fewer bits mean smaller file sizes.
Bit Rate: A unit of time in bits per second. 128bps is 128 bits (information) transferred in a digital setup per second. The lower the bit rate, the lower the audio quality will be in the file.
Constant Bit Rate (CBR): The amount of information transferred in the compression process is the same for the entire file. This makes things like file size and audio quality more predictable. Podcast hosting providers recommend you upload CBR MP3s rather than VBR MP3s.
Variable Bit Rate (VBR): The amount of information transferred in the compression process fluctuates based on the algorithms of the converter and codec used. The potential drawback is file size, and the audio quality of the compressed file can be unpredictable.
Average Bit Rate (ABR): This calculates the average amount of bits in bps for the audio compression process.
Potential Issues of Converting WAV to MP3
If you want to podcast, then there’s no real getting around the fact you’ll need to convert WAV to MP3. Here are some potential technical issues to be aware of:
- Harmonic distortion can occur and be heard in the final file when using lower bit rates.
- A loss of bass detail may occur.
- A loss of transient detail may occur.
Bear in mind that the vast majority of podcasts are spoken-word conversations, and the vast majority of listening takes place on the go through a set of earbuds. This means the likelihood of any audio degradation—if it occurs at all—will be noticeable to absolutely no one.
But if you’re looking to create more highly produced audio with rich soundscapes, music, and sound effects, exporting your MP3s at a higher bitrate will help protect them from issues.
Conclusion & Next Steps
The biggest reason we use the MP3 format for podcasting is to decrease file size for podcast hosting distribution and lessen the burden on home consumer devices and listener data plans. MP3 has improved since its inception to lessen the blow of information loss in the conversion process. Is it perfect? I personally don’t think so. But for now, it’s the gold standard for audio file compression.
Now that we’ve covered the ins and outs of converting WAV to MP3, here are some follow-up resources: