An Introduction to the Audio Spectrogram
Editing audio in the digital realm has evolved leaps and bounds since the 90s. What has become possible with software, even within the last ten years, is mind-blowing upon reflection. An audio spectrogram is one such amazing software-based tool. Read on for an introduction to using an audio spectrogram for the purpose of editing and mixing!
What Is an Audio Spectrogram?
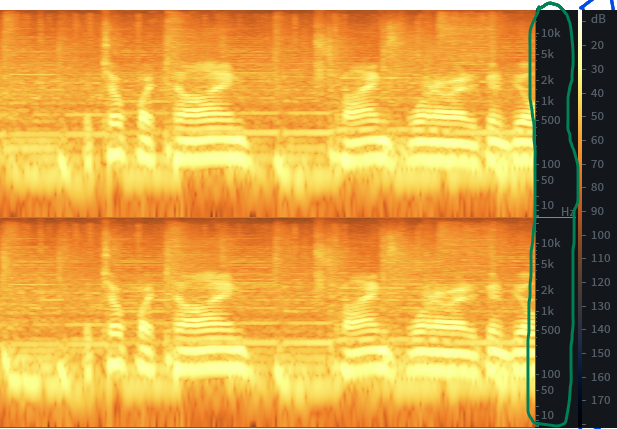
An audio spectrogram is a visualization of all the frequency content in a waveform. Circled in green is the frequency meter, in Hz. This shows you the frequencies that make up all the sound content in a waveform. Next to this meter, notice there is a colour legend with a scale next to it. This tells you how “loud” different frequencies are, in decibels. This particular image is a master audio file, so it is a bit busier looking as it contains dialogue, sound effects, and music.
An Audio spectrogram is jam-packed with information that you can never get by just looking at a waveform. But, how do you decode all this information for practical purposes?
How to Read an Audio Spectrogram
There are a handful of “shapes” that will appear in an audio spectrogram, regardless of which software you are using. The screenshots used are from iZotope RX Editor but, again, others will look similar. You’ll find one in Adobe Audition, too. The following image of a raw unedited dialogue track will be used as the reference for the basic shapes.

Basic Shape: Ticks
Ticks: these can be a few things, but if you see one it will usually be something that you’ll want to clean out. They can be:
- Digital click caused by bad edit or interface buffer issues during recording
- Hitting a mic stand
- Spit
- Anything that makes a “tick” sound – think how a twig sounds when you snap it.
Circled in black are examples of “tick” based sounds you would want to edit out. Notice how the second one doesn’t look that prevalent. However, once the audio is boosted to final “loudness” it will stick out like a sore thumb! That’s the beauty of the audio spectrogram. Even if you may struggle is hear an issue, you can see it and nip it in the bud before it becomes an audible issue!
Basic Shape: Breaths
Breaths are one of those auditory events where people either want them gone completely or lessened. If you, or a client you are editing for, falls into “all breaths must go”, knowing what they look like can speed up time. Circled in pink are breaths. No matter the person, breaths will take that shape. You may come across one with a “tick” in it. This would be from mouth noises or spit – most commonly found in “f” sounds.
Basic Shape: Clothing Movement
Circled in lime green is an example of clothing movement. They can be easy to miss but typically it’s a good idea to clean those out.
Basic Shape: Low-End Drones
Circled in blue is a shape that can be a few things:
- Traffic drive-by
- AC/Heater/HVAC
If it’s a solid bar at 50Hz or 60Hz you may have a ground loop issue. A power conditioner may be needed to fix this prior to recording.
Basic Shape: Interference Hums
Hums from interference are what the white arrows are pointing at. The thin bars start at approximately 2KHz, with six separate bars up to around 15kHz.
See the multiple thin bars? You either have interference hum or a computer fan. Computer fans can look fairly similar. Either way, it’s another “shape” you’ll want to clean up.
Basic Shape: The Voice
Any sort of vocal content will look like those wave lines circled in purple (even from animals). The brown outline within the purple shows the initial puff of air at the beginning for a plosive. The brown outline at the end is the common shape for sibilance
Everything outside of coloured circles is the room tone. More on the room tone later!
Editing Decisions Based on an Audio Spectrogram
Now that you are beginning to get a sense of the basic shapes within an audio spectrogram, you can put this new knowledge to practical use.
The most common misconception is that noise reduction will remove all noises of all types. While it can, if you use it as a blanket process, you’ll end up with bubbly sounding audio. This should be avoided as much as possible. So how does one remove different types of noises if not using noise reduction? You use tools specifically tailored for a specific job.

Editor’s Note
Less is more in this type of editing. Always start with the lowest strength. Sometimes multiple passes at a lower strength value with have better results than set to the maximum
Tips for Basic Editing:
Start with presets, but don’t be afraid to move the sliders around. iZotope tools allow you to output clicks, breaths, noise, etc., on most of their tools. Really zeroing in on the issue will render the best results.
Noise reduction works best to lower a noisy room tone – think of it as the hiss/white noise-like sounds. It can help with hum issues but sometimes a de-hum tool will give better results. For best results, complete multiple passes at 3db reduction can do a better job at cleaning. Yes, it takes more time but the results are usually worth it.
De-breathers are tricky. They can either do exactly what you want or make things worse. A common issue I run into is that it cuts off breaths or creates gaps of digital silence. If you have access to Ambience Match, simply replacing the breath with learned ambience from your file works wonderfully.
Digital Silence: occurs when you create an empty hole in the audio. This can create a noise dropout and/or a click at the beginning or end of the silence. You actually want room tone throughout the entire file at a low level. Sometimes there are noises that can’t be cleaned out with de-clickers and the like. A manual approach by selecting only the issue, leaving everything else untouched, is occasionally needed. This is a bit more advanced, however.
Using an Audio Spectrogram for Mixing
Have you ever been at a loss when it comes to EQ’ing? An audio spectrogram can help pinpoint issues or enhance the audio. Recall how an audio spectrogram shows how “loud” frequency content is.
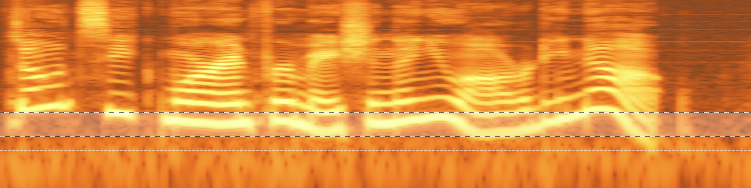
Most audio spectrogram software allows you to select horizontally and will tell you the frequency range selected. In the example above, ~200Hz is fairly bright. The 200Hz range is notorious for “mud”. This “mud” results in the voice being unclear, aka muddy.
This technique can help you find issues quicker without guessing which frequencies are the issue.
You can use this technique to find “sweetener” frequencies specifically tailored to the voice you are working with. Around 1500-2000Hz for a female voice is usually a good place to start to “make it pop”. In the image, 1500-2000Hz isn’t overly bright in colour, so giving it a slight boost could brighten the voice a bit.
In Summary
Audio Spectrograms are a useful tool. It doesn’t need to be a complicated mystery either. The tools associated with it are becoming more accessible in price, with plenty of cross-update offers to expand on your own terms. After reading this, you should be able to use these tools or improve your efficiency for basic principles.
You might not start using an audio spectrogram right away as the most important thing is establishing a sustainable workflow. But this is definitely something you can begin to play with over time as you look to hone your editing skills. Alternatively, you might just end up outsourcing podcast production altogether. There’s no right or wrong approach – only what works best for you.
If you’re interested in learning more of the intricacies of audio editing, why not check out Podcraft Academy? Our courses and tools can help you with any aspect of launching or polishing your podcast, and we run weekly live Q&A sessions in there too.