What’s the Best USB Audio Interface for Podcasters?
What’s the Best USB Audio Interface for Podcasters? At-a-Glance
- USB audio interfaces allow you to run one or more XLR mics into your computer.
- They can offer an increased range of flexibility and options when compared to your typical USB mic setup.
- USB audio interfaces tend to be small, light, and a lot less cluttered than a standard mixer.
- The best USB audio interface for you will depend on your own unique budget, setup, and needs.
- Read on to find out more.
- Or, jump to our best USB audio interface recommendations.
Podcast equipment setups vary from person to person. Some podcasters prefer to keep things as simple and as minimalistic as possible. Others are always looking to add the latest shiny thing to their arsenal of audio gear.
The easiest way to get set up and ready to record good-sounding audio is to plug in a USB mic. The quality of USB mics has come on leaps and bounds these past few years. That said, a lot of podcasters feel the desire to “graduate” to an XLR mic after a while, as they begin to explore ways to take their audio quality from good to great.
If this sounds like you, then you might also be in the market for a USB audio interface. Whatever XLR mic you pick up (see our best podcast microphone choices right here), you won’t be able to run it directly into your computer.
Of course, you don’t even need a computer to run an XLR mic. You could plug it into a digital recorder instead. But if you record online with co-hosts or interviewees, or, prefer to record directly into your DAW, then getting yourself a quality USB audio interface will make a lot of sense.
What is a USB Audio Interface?
A USB audio interface is a little box into which you can plug an XLR mic. Depending on the model, you can sometimes plug multiple XLR mics in.
A USB audio interface will connect to your computer by – funnily enough – USB. This setup gives you much more control and flexibility than your typical USB mic setup.
You’d also plug your headphones into your USB audio interface. It becomes both your input and your output. You simply need to select both these options when setting your preferences in your DAW or call recording software.
USB audio interfaces tend to be smaller and lighter than your average gaming console. They’re typically free from too many knobs and dials and look much simpler than their mixer counterparts.
Not all audio interfaces are USB, however. It’s actually quite a broad term, and audio interfaces come in all shapes and sizes. There’s the built-in sound card inside your computer. There’s tiny little USB dongles. There’s the circuitry built into a USB microphone. And then there are breakout devices, ranging from a simple USB interface with a microphone input all the way up to the large rackmount interfaces found in many studios.
While the info in this guide certainly applies across most audio interfaces, for the context of podcasters working in their home studio, we’ll primarily address small two- and four-channel breakout devices that connect to your computer via USB, Firewire and other similar digital connection ports.
So now that you know a bit more about what they are and why you might want one, what are the best USB audio interface options out there right now?
Best USB Audio Interface for Podcasters: Model, Price, & Audio Quality
‘Best’ is always a very subjective term. Of course it’s going to depend on your own unique needs, setup, and budget. You’ll find a recommendation here that looks right for you.
Just a quick heads up, too, that we sometimes use affiliate links for products we review. This means we may earn a commission if you were to buy through them, never at any extra cost to yourself. Affiliates help support all the free content we put out on the site on a regular basis.
With that said, let’s dive into the recommendations. Here are our favourite USB audio interface options to date.
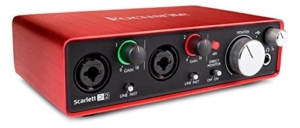
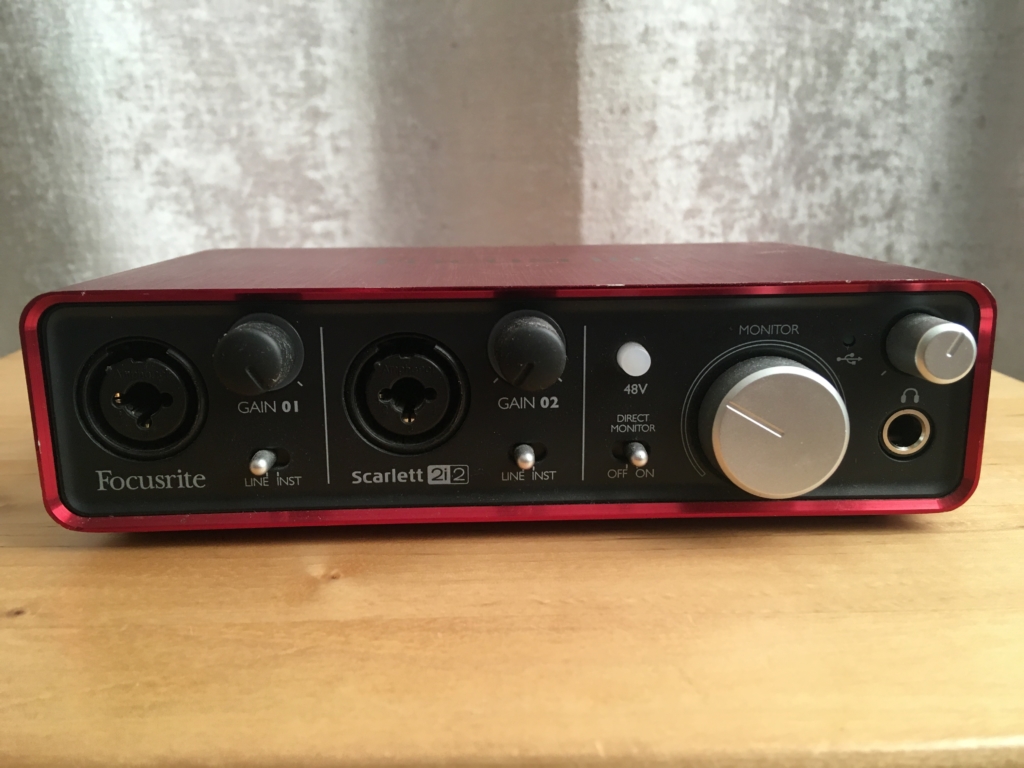
Focusrite Scarlett 2i2 – The Best Seller Option
- Cost – $99/£130
- XLR Inputs – 2
- Size – 19.51 x 5.31 x 3.35 cm
- Weight – 640g
Sound samples recorded with Rode Procaster, Shure SM58, and Samson Q2U mics. No post-processing has been applied.
I’ve owned a Focusrite Scarlett 2i2 for many years now, and it’s still an integral part of my home recording setup. This is arguably the world’s best-selling USB audio interface and is used by millions worldwide for recording audio and music.
Read our full review of the Focusrite Scarlett 2i2
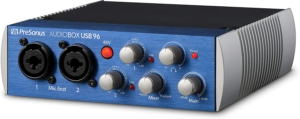
PreSonus AudioBox USB 96 – The Durable Option
- Cost – $99/£72
- XLR Inputs – 2
- Size – 4.45 x 13.97 x 13.97 cm
- Weight – 912g
Sound samples recorded with Rode Procaster, Shure SM58, and Samson Q2U mics. No post-processing has been applied.
The PreSonus AudioBox USB 96 is a great option if you’re someone who records on-the-go a lot. Housed in a heavy-duty steel chassis it can, in PreSonus’ own words, “take a serious pounding and remain completely reliable”. They proved this by driving over it in a truck. Case closed!
Read our full review of the PreSonus AudioBox USB 96
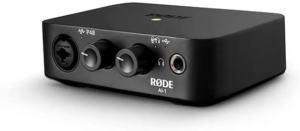
Rode AI-1 – The Minimalist Option
- Cost – $125/£95
- XLR Inputs – 1
- Size – 17.78 x 7.62 x 12.7 cm
- Weight – 454g
Sound samples recorded with Rode Procaster, Shure SM58, and Samson Q2U mics. No post-processing has been applied.
The Rode AI-1 may appeal more to folks who record solo or online conversations. It’s a minimalistic little interface that keeps things as simple as possible.
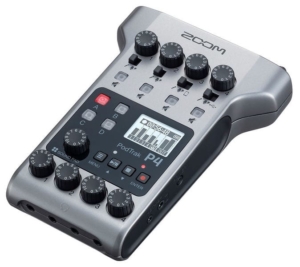
Zoom PodTrak P4 – The Versatile Option
- Cost – $199/£160
- XLR Inputs – 4
- Size – 112mm x 155mm x 47 mm
- Weight – 290g
The Zoom PodTrak P4 is a podcast-specific digital recorder which also doubles up as a USB audio interface. This means you’ll be sorted to record up to four local participants and remote guests whether you’re at your computer or not. Obviously, though, with more options comes more complexity, which might put beginners off.
It’s worth mentioning that, when used as a USB audio interface, you don’t have the same multitrack options as you do when recording directly to the SD card. However, there’s nothing to stop you doing both at the same time!
Read our full review of the Zoom PodTrak P4

Shure MVX2U – The Mobile Option
- Cost – $130/£130
- XLR Inputs – 1
- Size – 15.8 x 14.0 x 4.4 cm
- Weight – 100g
Sound sample recorded with Shure SM58. The interface applies gain and tone effects whilst recording.
The Shure MVX2U is a great USB audio interface option for the on-the-go podcaster. It’s tiny and lightweight, ideal for running your XLR mic as if it were USB, or even setups like plugging an XLR into your phone.
The MVX2U also has a lot of nice built-in features to help improve your audio. Find out more about its DSP technology, auto gain, and EQ settings in our detailed review.
Read our full review of the Shure MVX2U audio interface
Part 2: The Ultimate Guide to Audio Interfaces
Looking for a deeper dive into audio interfaces beyond a few top-level USB audio interface recs for podcasters? Then read on. In part two of our guide, we’re going to explain some of the terminologies around audio interfaces, as well as answer some frequently asked questions.
Can I Use the Audio Interface Within My Computer?
There’s little that would compel me to recommend using the audio interface built into your laptop. They’re noisy, unbalanced and made of components with varying degrees of quality in order to keep costs down. This applies to the interface on smartphones as well.
There are obvious benefits of recording away from your computer altogether. Without the help of a control room, fan noise and other computer sounds can bleed into the recording.
However, there are times when having a computer nearby is necessary, either for productivity or workflow, or, because you’re using a USB audio interface. For that, we need an interface that will suit our needs. And that’s where things get tricky.
Different sound devices are made for different applications. For example, I wouldn’t use a Presonus Audiobox to record sound effects. The mic preamps are too noisy for detailed sound recording, and the device doesn’t handle the sampling rates I need. For voice, however, the Audiobox would likely suit many people’s needs.
So, what are you looking for? Let’s look at the different features you’ll find, and what they mean.
USB vs Firewire
I hear arguments regarding USB vs Firewire all the time. I don’t intend to rehash them, as most are highly subjective. The arguments are often weighted by whether the individual uses a Mac or PC, and they fail to look at the bottom line: both USB and Firewire are plenty fast enough to handle your audio signal.
The most determining fact in whether to use USB or Firewire (or PCI, or Fireport, or Thunderbolt) is your computer. If your computer is not slotted with Firewire interfaces, there isn’t a compelling argument for purchasing a separate firewire interface to make other hardware work.
Analog vs Digital
Overall, the average user is going to be considered with analog inputs and outputs (I/O). Analog I/O refers to any signal where audio information is transmitted in the form of electrical pulses. In other words, if you plug a microphone, guitar or monitor into an input or output to transmit or receive sound.
This becomes confusing because the main purpose of an audio interface is to convert your audio to a digital signal. Or, to convert from digital back to analog in the case of outputs. An easy, if oversimplified, way to think of it is that if you can hear it with your ears, even if it is from a digital source, what you’re hearing is an analog signal.
Digital Inputs and Outputs (I/O)
Digital I/O ports include MIDI, SCSI, Timecode, optical, S/PDIF and other ports used to carry machine-readable digital information from one system to another without converting them to an analog sound source first.
I cover digital inputs in the context of recording voice only because it’s commonly a feature on audio devices. If you use outboard mic preamps, digital mixers or other digital devices in your chain, it’s important to ensure your devices have compatible digital inputs. Otherwise, you can likely overlook this feature.
Analog I/O
Analog Inputs and Outputs are one of the most important items to pay attention to. Typical external sound cards support both XLR and balanced TRS (¼”) cables, often in the same port (referred to as a combo connector). Ensure you use a balanced connection to avoid unwanted electrical interference. And make sure the audio connections on your interface match the connections on your microphones, monitors and other equipment.
Another Analog I/O factor is the number of ports. Audio Interfaces typically have two inputs and two outputs (2×2). Some have four inputs and two outputs (4×2).
It’s important to know how many devices you intend to connect to your audio interface in order to determine number of input and output ports. Multiple monitor combinations (5.1, quad, 7.1, etc) require an output for each monitor. Recording multiple actors requires enough inputs for each microphone you intend to plug into the device. For most podcasters and voice actors, a 2×2 or even a 1×2 recording device (like most USB microphones) are sufficient.
MIDI Ports
MIDI is used primarily for communicating between sequencing software and digital instruments and equipment. MIDI can also be used to control external peripherals like rackmount reverb modules. Unless you are a musician, a sound designer or a lighting designer, you likely don’t need MIDI ports.
Word Clock
Word clocks are used to synchronize digital playback and recording devices. Typically the internal clock from your computer hardware or software is sufficient. Again, unless you are heavily into creative audio production and design, a word clock is likely not a determining factor in an audio interface.
Driver Support
There are a number of different audio driver types. The key here is to ensure your audio interface meets your hardware and software needs. PCs typically run ASIO, WDM and MME. ASIO is low-latency. Core Audio is OSX’s low-latency driver. Ensuring your audio device is ASIO or Core Audio compatible will allow the widest compatibility. Check reviews for inherent issues between PC and Mac compatibility before you purchase.
Software Compatibility
I’ll be honest here. This is primarily a Pro Tools consideration. It’s also one of the reasons I’ve gone through so many audio devices. If you’re working in Pro Tools, this can be a frustrating trial and error. Something as simple as the crystal used in the sync clock of your audio device can make Pro Tools choke. This is less an issue since version 11, and there are a number of workarounds using a go-between software audio interface like ASIO4ALL (PC) or Soundflower (MAC).
Most podcasters don’t need anything as complicated as Pro Tools for their audio production. Audition and Audacity are two popular choices, whilst Alitu is the easiest way to record, edit, and produce a podcast.
Sampling Rate
Sampling Rates for most applications run from 44.1 to 192 kHz. Lower sampling rates are available, however they’re typically used for telephony, toys and other situations that do not require high-fidelity recording. In general, most studios record voice at 48 kHz. This allows some breathing room in the audio, and gives audio editors and designers a little room to stretch and pitch voices without losing audio fidelity.
For most voice and interview podcasts, 44.1 kHz is sufficient to capture excellent vocal audio. For voice actors, I recommend sticking to the 48 kHz studio standards. If you do voice for creature effects, higher sampling rates may be desired.
Bit Depth
Bit depth is important in determining your dynamic range for recording. Dynamic range is the difference between the softest signal your device can register above the noise floor and the loudest signal your device can reproduce without distortion. 16-bit is suitable for most podcast voice applications. For voice actors and studio professionals, 24-bit is standard. 32-bit is starting to become more common, but again these are typically used by folks like me who need to record loud engines, shotguns and jets without distorting.
Battery Power
This is for those of us who use our audio devices in the field. Handheld devices, like the Zoom H5, often have a setting to operate as an audio device on most computers. This makes them more adaptable for recording interviews in that cafe, rather than being tied to the studio.
Technical Specs
In A Beginner’s Guide to Microphones for Voice, I covered a number of different technical considerations when comparing microphones. The good news is, most of that information applies here as well. Let’s review!
Frequency Response
Frequency response refers to the range of frequencies your microphone can accurately reproduce at an equal level. Audio interfaces should record anything from 20hZ to 20kHz, the range of human hearing, and I would be highly dubious of any interface that doesn’t record at a minimum of that range.
Impedance
Impedance is a measure of your equipment’s resistance. Low-impedance, or low-Z, inputs allow long mic cable runs without introducing noise or reducing frequencies.
Equivalent Noise Level
Also known as self-noise, the equivalent noise level is the electrical noise or hiss a microphone produces. In general, a self-noise specification of 28dB and lower is acceptable for quality recording.
Signal to Noise Ratio (S/N)
This is the difference (in dB) between the audio interface’s sensitivity and the equivalent noise level. 64dB and higher is good. Here’s more on signal to noise ratio.
Audio Interfaces for Podcasters: FAQ
Alright, continuing our masterclass, time for some more frequently asked questions around audio interfaces.
What is a Preamp?
Sometimes audio interfaces are referred to as “preamps”, but this isn’t entirely accurate.
A preamp is any type of gadget that boosts the signal from your microphone, making it stronger and clearer. It’s like turning up the volume on your mic, but more precise and controlled. Audio interfaces have preamps built-in, and these preamps are specifically designed to work with the interface, so you get the best possible sound quality.
So, audio interfaces have preamps, but they aren’t “preamps” in themselves.
Where Are My Recordings Saved When Using an Audio Interface?
A USB audio interface won’t store and save audio itself – that will happen in whatever DAW or recording software you’re using.
Inside any software you’re using, you just need to remember to set the interface as the “input”. So, for example, I might be recording with a Samson Q2U mic into my Focusrite Scarlett 2i2 USB audio interface and Adobe Audition. Audition – the software – will ask for my input, and I’ll select “Focusrite Scarlett 2i2”. Some podcasters get confused here because they try to find and select their mic instead. But as the mic runs into your interface, your DAW will treat the mic and interface as one device.
Digital recorders are a type of audio interface that can store audio directly via a memory card, without the need for a computer. You can also set up most digital recorders to work as USB audio interfaces, but at that point, they’ll store audio on the computer (via your software) instead.
Can an Audio Interface Improve My Podcast Sound Quality?
Yes and no. In an ideal world, better equipment means better sound quality in your end product. But there’s a lot more to it than that.
You can buy the best gear in the world, but if you’re recording in a suboptimal environment with loads of reverb and your mic technique is terrible, then your podcast will sound bad.
Fortunately, it doesn’t need to be difficult or expensive to create a podcast studio. And, your mic technique can be optimised with a few simple tips. Once you have these essential basics nailed down, then there can be a noticeable jump in quality if you’re transitioning from a cheap USB mic to an audio interface setup.
What is Phantom Power?
Phantom power is a way to send power to a condenser microphone. It usually appears as a little LED light on an audio interface or microphone.
When you turn on phantom power on your audio interface or mixer, a little bit of extra voltage gets sent through the microphone cable, which powers the condenser element in the microphone. Without phantom power, the microphone might sound really quiet or not work at all.
Make sure you check if your microphone needs it before you turn it on – some microphones, like dynamic mics, don’t need phantom power and could even be damaged by it. And when you do use phantom power, turn it off before unplugging the microphone, or you might hear a loud pop that could damage your equipment.
Monitoring via the Headphone Jack
Every USB audio interface on the market will have at least one headphone jack. It’s best practice to plug your headphones in here and monitor your recordings. This allows you to hear the audio in real-time as it’s being recorded.
Monitoring through headphones ensures that you can hear the exact same audio that’s being captured by the microphone or other input device. This is important because it allows you to catch any issues with the recording right away, such as unwanted background noise, clipping, or distortion.
By monitoring your recordings through headphones, you can also ensure the audio levels are set correctly. If the levels are too low, you may end up with a recording that’s too quiet and difficult to hear. On the other hand, if the levels are too high, the recording may be distorted and unusable.
What Are the Best USB Audio Interfaces for Podcasters? Summary
As I’ve said already, the best option for you is going to depend on your own unique needs, setup, and budget. By looking over the input options, price ranges, and listening to the sound samples, the chances are you’ll have made your mind up by now.
For the vast majority of podcasters, based on the above, it’s going to be a toss-up between the Focusrite Scarlett 2i2 and the PreSonus AudioBox 96. Folks looking to keep things dead simple and minimalist may opt for the Shure MVX2U. The more experienced podcaster (or, someone who wants maximum flexibility) might want to splash out a bit to get all the options available with the Zoom PodTrak P4.
Need More Help?
If you’re still weighing up what gear to buy, remember to also check out our Best Podcast Microphones and Podcast Equipment roundups. You’ll find all our top choices right there.
We also have courses on everything from equipment choice and setup, to audience growth and monetisation inside Podcraft Academy. We run weekly live Q&A sessions in there too, so you can get regular tips, advice, and support that’s uniquely tailored to you.