Audio Compression Explained: How to Use Compression in Podcasting
In our audio compression explained guide, we’re going to look at how to use this tool in podcasting and spoken-word content. Compression is a technique that podcasters often talk about, and even more often misunderstand. But, used right, it can really improve your audio.
So, let’s get to know the humble compressor, starting with the obvious question…
What is a Compressor?
Recording voice, instruments and other sounds can result in large differences in the recorded dynamics (volume levels over the course of the performance). This leads to some very loud and some very soft sounds in an overall performance.
These variances are difficult to mix, or sometimes inaudible in the track. A compressor helps compensate, by limiting the dynamic range.
Dynamic range: the difference in amplitude (dBa) between the loudest and the softest audio in the track.
Let’s take a look at the settings on a compressor and see what makes it tick. I’ll be showing the Dyn3 compressor found inside Pro Tools, but nearly every compressor contains a similar form of these settings (except perhaps Gain Reduction, which varies from compressor to compressor). It should be easy to translate this into Audacity, Audition, or any other DAW.

Editor’s Note
This popular Audio Compression Explained guide was originally published in 2018 but remains every bit as relevant today. Before we dive on in to learn about compression settings, it’s worth pointing out up front that, whilst some folks love to learn and master (no pun intended) techniques like compression, others might not be so keen.
The good news is that these days, you don’t need to know the ins and outs of compression to use it in your podcast. The ‘Podcast Maker’ tool Alitu does it for you automatically (along with other audio processes like Noise Reduction) and is perfect for those who just want to get their content out there. So if that’s you, be sure to check out Alitu with a 7-day free trial, and if you DO want to learn all about audio compression, then read on 😀
Audio Compression Explained: The Settings
When you’re dipping into any compressor tool for the first time, these are the settings you’ll most likely be confronted with. Let’s find out more about them and how they work.
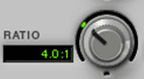
Ratio
Compression ratio is the first adjustment I make when using a compressor. The ratio determines the amount of compression added to the input audio. In the most basic terms, a ratio of 4 to 1 (4.0:1) indicates that for every 4 dB (4.0) of increased volume in your input, the compressor will only allow a 1 dB (1) increase in the output.
Some compressors plot the ratio as a transfer curve. The X-axis represents the signal’s input and the Y-axis represents the compressed output. A ratio of 1:1 means no compression is taking place. A ratio of 20:1 or greater (up to 100:1,inf:1 or ∞:1) means the compressor is acting as a limiter (discussed below).
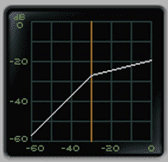
Note: The graph here also represents threshold and knee, and I’ll cover them in the following sections!
Threshold
My next go-to knob after setting the ratio is the threshold. Threshold is the smallest amplitude the compressor needs to detect before compressing. Any signal under the threshold is given no compression (1:1). Compression is applied to signals above the threshold.
If the threshold is too low, any hiss, noise, room tone and mouth noises are compressed with the rest of the audio signal. When applying gain to bring your volume to mix level, all that noise and other garbage will also be made louder in the mix. As you’d imagine, that’s not what you want.
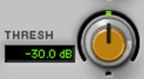
Set the threshold at the minimum level of the desired audio input. That is, set the threshold to the lowest volume of the recorded instrument or sound. Then adjust by ear, until you find the desired threshold.
When setting any setting, your ears are more reliable than the numbers on the screen in determining which value is correct. While there are general numbers that will work for specific situations, no number is perfect for all situations.
Gain
Now that we’ve compressed our signal, we want the level audible in the mix before we fine-tune. Compressed audio leads to a decrease in volume. If we have an input signal between -60 dB and 0 dB, we have a dynamic range of 60 dB.
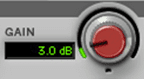
Compressing that signal by 4.0:1 squashes that signal by ¼ (invert the ratio). This leaves us with an output dynamic range of about 10 dB (60 ÷ 4).
Any signal above our -15 dB threshold will reach at most an amplitude of -9. You’ll need to boost your output signal gain by 9 dB if you want your loudest levels to reach 0 dB.
Gain Reduction and Auto Gain Correction
Many compressors have a gain reduction meter in the levels or output indicator. They are a visual representation of your gain loss as we described above. In terms of our example, the meter would display its highest value at or around -9 dB. From there, we could adjust the gain knob until the output meter reached the desired level.
Some compressors have a checkbox or setting that allows for auto gain correction. Auto gain correction automatically sets your gain values according to the calculated gain reduction.

Attack and Release
After you have your compression settings dialled in, some fine-tuning is needed to settle the audio into the mix. Setting your attack and release times will help smooth out some of the transition.
I tend to keep my attack settings over 50 ms to reduce pumping and harmonic distortion in the lower frequencies. At minimum, attack times should engage the compressor before the signal completely decays.
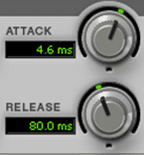
Release times should allow the compression to fall off naturally at the end of a sound. Too short release times result in clipped, unnatural sounding ends of words. Too long release time allows audio below the threshold into the compressor. Typically a release of 80 – 150 ms is enough for most dialog.
Soft Knee vs Hard Knee

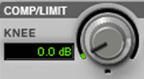
‘Knee’ refers to the bend in the transfer curve between the compressed and uncompressed audio.
A hard knee will immediately compress the signal after reaching the threshold. A soft knee gradually attenuates the signal before and after the threshold to make a more gradual sweep into the compression.
Soft knee compression is often more pleasing to the ear. Use the soft knee for things like vocals and melodic instruments. Drums and concussive sounds often sound better with a hard knee.
Many compressors have a switch that sets either soft knee or hard knee. Others are dialled into a specific setting. The dB setting of a dialled knee refers to the level above and below the threshold that the compressor will begin to attenuate the signal.
Attenuate: To reduce the level of a signal
Limiter
What’s the difference between a limiter and a compressor? In actuality, a limiter is a type of compressor. More accurately, a limiter is a compressor set to a very high threshold and a very high ratio. Anything above the threshold compresses to keep the signal from clipping or going over the desired threshold, hence limited.
Any compression over 20:1 is a type of limiting. A brickwall limiter – common for recording loud percussive noises like explosions and gunshots – is a compressor set to a threshold of -1 db with a ratio of 100:1,inf:1 or ∞:1.
To clarify how this works as a type of compression, a ratio of ∞:1 means that for every infinite dB of gain of input (in other words for any gain) the compressor allows only 1 dB of output gain. Used properly, limiting keeps your loud signals from clipping. However, too much limiting can cause an unnatural squashed sound.
Audio Compression Explained: Compression Is Your Friend
Out of all the tools in my audio arsenal, compression and limiting are the ones I use the most often. Properly used compression helps compensate for extreme volume adjustments in recorded tracks, allowing smoother, more consistent listening levels for the listener.
To Learn Compression (Or Not?)
Only you can decide whether or not this is a tool you’d like to master.
Yes
Like anything else, with a bit of playing around, trial and error, you’ll begin to use compression effectively in your audio. Knowing the ins and outs of it will give you more nuanced control over your sound, along with the added satisfaction of having learned a new skill. Why not open up Audacity, Audition, Hindenburg, or your editing software of choice and give it a go?
No
For those with no interest in knowing anything about how audio and sound works (podcasters who just want to get their message out there) then tinkering with compression isn’t time best spent. Outsource your production to an audio pro, or use a ‘Podcast Maker’ tool like Alitu which runs processes like compression and noise reduction automatically.