What Is a Pop Filter and Do I Need One: How to Stop the Pop
What Is a Pop Filter? At-a-glance
- A pop filter is used to eliminate the sound of plosives.
- Plosives cause a rush of air that can cause the microphone capsule to overload.
- If you publish an episode laden with untamed plosives, your audio can sound jarring and unprofessional.
- Fortunately, pop filters are cheap to pick up, and simple to use.
- Read on to get the full lowdown…
You’re well underway on your podcasting journey. You have your cables sorted. A booth, (in some shape or form) has been soundproofed. And, while completing sound testing, you even relieved yourself of gear-related noise.
The first recording has been sent off to an editor and you’re given a note. Your mic is popping! Be careful – could you maybe try moving back? Maybe at first you aren’t sure what they mean and ask for clarification. The editor, in turn, explains your plosives are creating a popping thump. But wait! You already use a pop filter so how can this be?
Don’t fret. In this article, you’ll learn about the basic mechanics of plosives and pop filter techniques to help eliminate that pesky popping sound.
What Are Plosives?
Before we get into the specifics of pop filters, it is important to understand some mechanics of the mouth in regards to sound.
We typically think of plosives as the sounds for b, p, t, and k. However, as it turns out, the mechanics of plosives are much more complex. There are actually three types of plosives – bilabial, alveolar, and velar.
Speech-Language Pathologist Mary-Anne Zubrycky, M.A.S-LP(C), shares some mechanics of plosives. This knowledge can help you control these problematic sounds in a recording scenario:
Plosives are consonants which are produced by stopping the flow of air at any point in the vocal tract, and explosively releasing the air. Plosives refer to a particular nature, or feature, of a consonant.
Recording people have trouble with unvoiced plosives. Those are the plosive sounds where the vocal cords are uninvolved, or the cords are ‘open’ or non-vibrating. These sounds are p, t, and k. They can result in unattractive popping sounds and buzzing noises. In addition, a non-plosive sound, the continuant s, can also be a problem.
Understanding consonants, manner of articulation, place of articulation, and allophonic variation of any sound, particularly plosives, all make a difference to performers, technicians and professionals in the recording world.
Try this sentence with a candle, a light match, a mirror or just the palm of your hand. Say this p-loaded sentence paying close attention to where the p sounds are exploded to a greater and lesser degree:
Paul Harper Phillip adopted a pet hippo from a Peace River cop in April.
Whether you are getting into podcasting, interviewing, singing or acting, knowing about plosive sounds can help you with microphone use such as axis, distance, mic filters, and other recording techniques, in addition to modifying your own articulation of speech sounds.
What are Pop Filters & How to Use Them
I digitally sat down with Yanni Caldas of Amnesia Sound to break down this mystery.
What is a pop filter and what do they do for the performer?
Yanni: A pop-filter is used to eliminate the sound of plosives. Plosives cause a rush of air that can cause the microphone capsule to overload. This results in a distorted or low, airy thump. These issues can be treated through the use of different styles of pop filters.
With so many to choose from, and numerous ways to position them to get the best use possible for your project, it can seem daunting for beginners to understand how to get the cleanest possible sound.
Can you tell us about the different types of filters?
Yanni: There are 4 main types of pop filters:
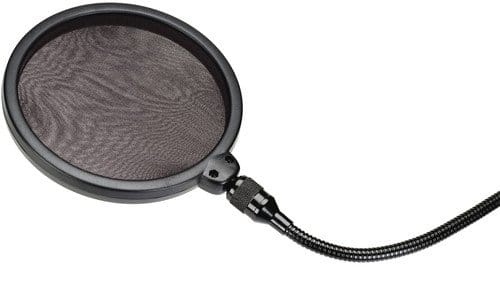
- Clip-on mesh/nylon that clip onto the mic stand with an arm that you can use to position it where you want.
- Clip-on metal pop-filters.
- Microphone attached.
- Then a not-as-conventional method of taping a pencil diagonally across the microphone capsule (this totally works for a unique sound, trust me).
Can you tell our readers when you would use the different types of filters?
Yanni: In music recordings, I always prefer to use either the clip-on metal pop-filters or the microphone attached. The choice, in general, depends on the performer and how experienced they are. With beginners, I often use a clip-on pop-filter as a way to position them roughly around the same spot.
The benefit of the clip-on pop-filters is that they can be used with practically any microphone and still provide an amazing result. For best practice, I like to have the pop filter 3 inches away from the microphone itself. Sometimes I have the pop filter 1 inch away and other times 6 inches away. It all depends on the performer and what sounds best to your ear.
From there, you find the best distance for the performer from mouth to filter?
Yanni: Yup – anywhere from 1 to 5 inches away from the pop filter itself.
With more experienced performers who are well trained in knowing how to create fewer plosives in their pronunciation, I prefer to use mic attached pop-filters. These allow for performers to get right up to the microphone and, when often using beautiful sounding condensers, they allow for all of the intricate details to be picked up with intimacy whenever the performer gets closer to the microphone. It allows for the microphone to be protected whenever the performer moves further away whenever they raise their voice.
Anyway, a key thing to know with the mic attached pop-filters is that these often only work with certain microphones that have pop-filters specifically designed to fit onto them.
For voice-over work, specifically, I tend to prefer nylon pop-filters over metal ones. I found that nylon pop-filters were really good at gently darkening up the audio so it’s slightly less bright.
As for positioning, I have preferred for voice-over to not be as in-your-face to make for a more natural experience, like a conversation from person to person. Having the pop-filter about 6 inches away and then the talent another 3 inches from the pop-filter generally allows for a natural performance that is pleasing to the ear.
There are times, however, more often than not that the microphone is 2 or more feet away. At that point, using a pop-filter is no longer needed. It is always best to listen in to what you’re doing to find the sweet spot where your audio will sound good.
Are there any other times when you wouldn’t need to use a pop filter?
Yanni: Some dynamic microphones already have pop-filters built into them, such as the SM7B or the SM58. These generally don’t need any additional pop-filter and can give a great sound out of the box.
I Moved Back but I’m Still Popping
Sometimes recording two feet away from the microphone isn’t an option. So what can you do if your plosives are still overloading your mic with a filter?
- Raise your mic starting by two inches to help offset air flow from overloading the capsule.
- If this fails, angle the mic back slightly (less is more in audio). Try four inches from mic to filter. Then another 2-4 inches from filter to mouth to start. If this fails as well, you can incorporate moving the entire stand upwards.

You’ll need to be mindful of your microphone’s polar pattern to ensure your voice doesn’t become thin or hollow-sounding by going off-axis.
You and Your Plosives
A pop filter and knowing how to pronounce effectively around a microphone work together hand in hand. It’ll be trial and error as everyone is different. Use your ears. Trust your ears. Keep doing sound test recordings until you’ve found that sweet spot, trying out all the different techniques suggested in this article.
Good luck and happy recording!
If you wish to understand more about the mechanics of plosives, and to learn how to control your own, you can read more from Mary-Anne at: So, You Want to Know About Plosives.
And, if you’d like more help with any and all aspects of podcasting – from recording quality audio to monetization and promotion, be sure to check out Podcraft Academy. That’s where you’ll find all of our courses, resources, and we run weekly live Q&A sessions in there too!