How to Set Levels for Recording (and Why It Matters!)
How to Set Levels for Recording: At-a-glance
- It affects the entire production process and quality
- It’s important – but doesn’t need to be complicated
- Set your levels incorrectly and the noise issues can pile up
- ‘Fixing it in post’ may make it worse
- Read on to get the full lowdown on how to set levels for recording…
The importance of ‘gain staging’ is talked about a lot, but what does this actually mean? How is this accomplished? This is one of the biggest mysteries remote voice actors and podcasters struggle with when setting recording levels. Fear not! In this article, I will guide you through some basic principles and, more importantly, what to look for when setting your recording levels.
What Is Gain in Audio?
As defined by The Audio Dictionary, “The amount of increase in the power of a signal by an amplifier is called the power gain. It is simply the ratio of the output power to the input power and is expressed in decibels.”
But what’s the non-textbook answer for gain in audio? A useful metaphor is to think of it as a flood gate. You can think of gain as the gate itself and the water as the signal coming through (i.e. sounds from the microphone).
The wider the gate (gain) opens, the stronger the flow and consistency of water (your voice as a signal) and its contents. If it’s only open a tiny amount, only a little bit will flow through, inconsistently. When the gain is low you have a higher chance of letting through a higher proportion of sediment/contaminants (noise) in relation to the amount of water (your voice). That’s all there is to it.
Volume vs. Gain
The biggest misconception about gain is that it’s used to describe volume. That’s somewhat right but, also… somewhat wrong. Audio is complex like that, sometimes.
Volume is just perceived loudness at the end of the signal after all processing is complete. The tone of the recording doesn’t change simply by making it louder by upping the fader above 0.
The gain will determine how loud a recording is BEFORE processing. It’ll also affect the tone of a recording. If you’ve ever had an audio engineer or podcast producer tell you to match the gain setting for retakes/pickups to the initial recording, this is why.
The slightest changes in settings can make the tone sound totally different. For continuity reasons, from episode to episode of a podcast, for example, it’s always a good practice to mark or take a picture of your settings on the interface. Sometimes fur buddies, children, loved ones, or you, yourself, could accidentally bump something in between sessions.
How to Gain Stage
The goal of gain staging is to have the desired sound come through the loudest, and undesirable noise well below it. Unfortunately, we can’t always control what is being picked up into the recording signal.
I’ve instructed many narrators for hundreds of audiobooks with the following technique. Best of all, it works in any software!
Note: Make sure to try to isolate yourself from environmental noises as best as possible in your booth prior to recording. A sturdy foundation makes for the best results.
- First, make sure the meter in your software is visible and large enough to see the numbers in detail.
- Have your peak levels consistently hitting around -9 on the meter, with the true peak between -6 to -3.
Note: The meter is going to fluctuate. This is normal. Try not to go below -21 on the meter often when speaking.
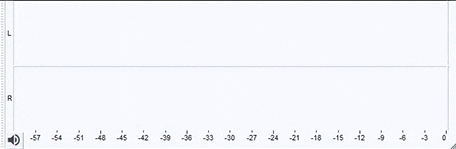
The peak, aka the highest point of the signal shown on the meter at a given point in time, is the solid bar (in this case, the horizontal green bar); whereas, the thin blue line is the true peak. No matter which software you record in, your meter will follow this basic shape (although the orientation may be different, eg: vertical rather than horizontal). Check to make sure your meter is set to peak or true peak, and not RMS. Right-clicking on a meter usually brings up options if there are multiple metering units.
You never want your peak or true peak to hit 0 on your meter. Why is this? Clipping!
Clipping
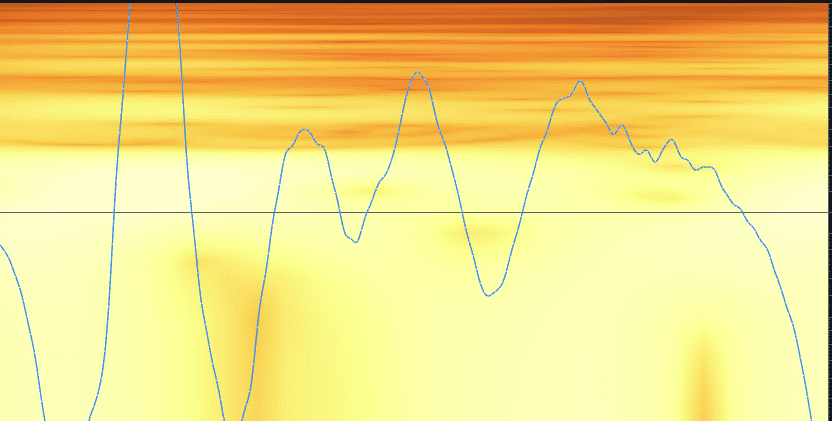
As you can see in the image above, the top of the waveform is cut off. What does this mean? Your audio will sound harsh, hollow, and/or gritty. It is best to avoid that rather unpleasant sound.
If you follow this guideline using your DAW’s meter for recording levels, you should be close to -24 RMS. Between -20 RMS to -24RMS is a good starting point for a raw recording. You typically don’t record at the final “volume” that a mix is rendered at.
RMS = Root Means Square. What does that mean? It’s essentially a measurement of the average level of audio.
Low Recording Levels
An RMS reading of -30 RMS, for instance, is on the low side. You can start to have noise issues and not just from your environment. When you boost the voice in the mix a few things can happen:
- If you have room reflection issues, these will become painfully present.
- Noise from your recording environment can potentially be louder than it would have been if the recording levels were healthy.
- Your hardware (interface) could introduce noise/hiss.
Every electronic device has self-noise. No matter how expensive a piece of gear is, self-noise exists in it. Some are higher than others. Audio hardware is happiest at a certain amount of level coming in and out… simply, not too low and not too high. There is a sweet spot to find, but the above method using the meter to set recording levels should help.
Sample A uses the meter method above. Sample B does not and was recorded much too low. Both were brought up to -16LUKFS as a control mix level:
Sample A with healthy recording levels boosted for the mix: How to Set Levels for Recording
Sample B with unhealthy recording levels boosted for the mix: How to Set Levels for Recording
I’ll Fix It in Post
You may be wondering what’s the big deal? Can’t I just use noise reduction? Sure you can. However, a good mindset to have is to create a foundation where minimal post-processing is required. If the noise is competing with the voice in level, noise reduction can start to do more harm than good.
What kind of harm? A burst of hiss over your voice will be heard at the start of a cut, then noticeably drop at the end of the cut. This results in choppy edits. Also, the higher the amount of noise reduction that is needed, the more likely you will start sounding like you’re talking in underwater bubbles.
Does Setting Levels Need to Be Perfect?
Nope! Recording at a higher bit depth can help compensate for shaky gain staging… 32-bit is amazing, but that’s another article in and of itself! You run a higher chance of noise-related issues when recording at 16-bit.
Bonus Note: You can record at higher bit depths and sample rates. Dithering and downsampling later for final export can be done. However, simply converting to a higher amount will have no benefit once audio is recorded. Converting 44.1/16-bit to 48kHz/24-bit or 32-bit after the fact will only ensure the audio will play at the correct speed (sample rates affect playback speed) of the session file of the DAW and the extra bits will be “empty”. You can’t create more digital information if it was never captured in the first place.
How to Set Levels for Recording: Conclusion
Setting your recording levels with proper gain staging doesn’t need to be a terrifying experience. It will take some trial and error – as do most things with audio. However, it’s easier than it seems. A strong foundation will yield the best sounding results.
Happy Recording!
And, if you’d like more help with any and all aspects of podcasting – from recording quality audio to monetization and promotion – be sure to check out Podcraft Academy. That’s where you’ll find all of our courses (including our Beginners’ Guide to Recording Audio course), resources, and weekly live Q&A sessions in there, too!