Recording Skype Calls on Your PC using Voicemeeter
One of the many hats I wear is producing Radio Drama Revival. Frequently, host David Rheinstrom interviews guests about the medium, their process and interesting details about their lives. As a producer for the podcast and a number of show of my own, I have a number of tools for working worldwide with guests and cast members.
Today’s method is for PC Only, and uses a piece of software from VB-Audio called Voicemeeter
What is Voicemeeter?
VB-Audio refers to Voicemeeter as a virtual mixing board. And it is. But it’s much more. Voicemeter acts as a virtual audio cable, digital patch bay and really gives the user control over multiple audio cards by combining them into one interface. In my own applications, I use Voicemeeter to control multiple monitors and microphones in three to four applications at once.
Which version do I need?
While you can do a lot more in terms of configuration using Voicemeeter Banana, for most configurations, the standard version of Voicemeeter work just fine and are simpler to use. I’ll be using the Standard version for this tutorial.
Configuration
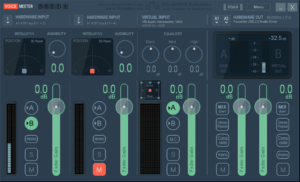
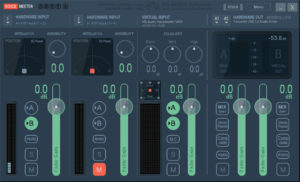
The Voicemeeter interface contains three sections and a robust options menu. The Main Screen features two multi-channel hardware inputs (1 & 2), a multi-channel virtual input and a hardware out featuring two main outputs (A1 & A2) and a virtual main output (B)
Step 1: Hardware Out
In the Hardware Out section, click the arrow below the A1. Select the appropriate audio card. I’m using a Focusrite Scarlett 6i6 in this example. If available, select the ASIO (this stands for Audio Stream Input/Output) version of your particular audio interface.

Step 2: Hardware Input 1
When using the ASIO driver, The first Hardware Input will automatically set to ASIO Input (1+2). For WDM, KS and MME configurations, you will need to set your hardware input manually. Simply click the arrow below the 1 in the Hardware Input section and select the same device driver selected in Hardware Out. If you are using a separate hardware for your microphone, select the device that supports your microphone. Ensure virtual bus B is selected to send the microphone to the virtual mains.
Step 3: Virtual Input
Ensure virtual bus A is selected to send audio from the DAW and Skype to your monitors.
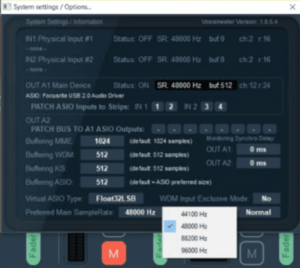
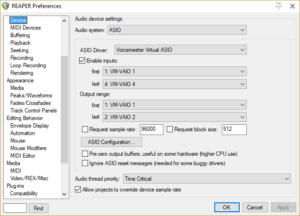
Step 4: Set Sample Rate
Click Menu > System Settings/Options. In the options window, set you preferred main sample rate to match whatever sample rate you intend to record in your DAW. Typically, either 44100 or 48000 will do for most purposes. More information on podcast sample rates.
Step 5: Skype Audio Options
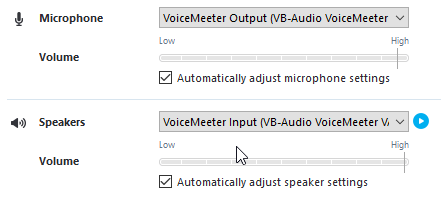
In Skype, navigate to your audio options menu. Set your microphone and speakers to the Voicemeeter virtual driver as shown in the image.
Step 6: DAW Audio Options
In your DAW, navigate to your audio options menu. Set your audio driver to the Voicemeeter virtual driver, as shown in the image. Use the ASIO drivers if they are available.
Local Recording
At this point you are configured to do local recording to your DAW while conversing via Skype. This configuration will record your end only, and not the conversation from Skype. This is ideal for voice actors who need to record only their own lines, and interviewees who only need to record their side of the conversation.
Step 7: Virtual Input [OPTIONAL]
In order to record the audio from Skype, simply enable Bus B in the Virtual Input Section to send the audio from Skype to the DAW for recording. This will allow you to record a single mono containing both your Skype call and your voice.

Step 8: Record to Separate Tracks [OPTIONAL]
To record the audio from Skype on a separate track, pan the audio from the virtual input to the right. This will allow you to record a two separate mono tracks. The first track, set to record Input 1, will record the microphone information. The second track, set to record Input 2 will record the audio from Skype.
Note: Playback in this configuration will be completely panned to the right ear. Return pan to normal by double-clicking on the red dot for normal listening when recording is complete.
Take Aways
I have worked with a number of virtual audio cables and virtual mixers, including ASIO4ALL. While there are more elegant solutions for recording interviews, if you are attempting to record an interview via Skype, Voicemeeter is the simplest solution I have come by.
Voicemeeter Banana opens your options up even more as it gives you multiple virtual inputs and outputs, eliminating the need for panning to record a separate track. That comes, however, at the cost of a slightly more complicated and potentially confusing interface.
There are many more tools, apps, and ways to record your podcast online too though. It’s all about finding what works best for you, your co-hosts, and your guests.