GarageBand Podcast Production: How to Edit a Podcast in GarageBand
When people first start a podcast, they usually choose the least expensive (preferably free) tools available. There’s nothing wrong with that. It’s a good idea to try things out before you make a big investment. For folks just starting out, it’s a good idea to consider GarageBand for podcast production.
Many folks turn to Audacity immediately. it’s open-source and works on nearly any computer. But, Audacity isn’t for everyone. If you’re a Mac user, you know by now that your computer comes with a digital audio workstation, GarageBand. This software has loads of features for musicians. With a rainy afternoon and some good coffee, you can put together a pretty solid electronic dance album based on the loops in the GarageBand library. But, GarageBand for podcasters is just as powerful and versatile. In fact, Marc Maron has had a healthy podcasting career for years, using GarageBand, and he even got to meet the President. Let’s take a closer look at GarageBand for podcast production, and see how this software can work for you.
What is GarageBand?
GarageBand is a simple digital audio workstation. The software has been standard issue with Macs since 2004. Now, it can run on desktops, laptops, iPads, and iPhones. It’s not the only mobile device app you can use for podcasting, by any stretch of the imagination. But, if you already use Apple products, it’s there for you.
What’s Good About GarageBand?
Users can add sound via microphone, interfaces, or musical instruments via USB or MIDI ports, or drag and drop audio files such as loops or pre-recorded sound effects. GarageBand has the features and flexibility to make a professional pop music album. Trent Reznor and Radiohead have used it. So, if you turn off some of the features meant for musicians (such as the metronome), it’s a great starter software for podcasters to use to record and edit their audio.
What’s Not?
GarageBand only works on Apple products. If your goal is, “to start a podcast,” and you don’t already have, or want to buy, an Apple computer, this isn’t a great idea.
Plus, not all podcasters want to learn sound design. Personally, I find that when I start looking at sound files in GarageBand, I will start picking at them like a mama cat grooming her kittens. But, I understand that audio editing can be a big obstacle for some podcasters.
If you want complete control over your podcast production, and want something that will remove background noise and level your audio, while make you sound really good, use an all-in-one solution like Alitu. If you want to start learning sound design, GarageBand is an excellent choice.

How to Record and Edit a Podcast in GarageBand
GarageBand may have been originally meant for musicians, but it definitely loves podcasters. In the next few steps, I’ll show you how to quickly make a simple podcast episode with Garageband. These instructions won’t show you all of the features available in GarageBand for podcast production. It’s a basic overview.
How to Record a Podcast in GarageBand
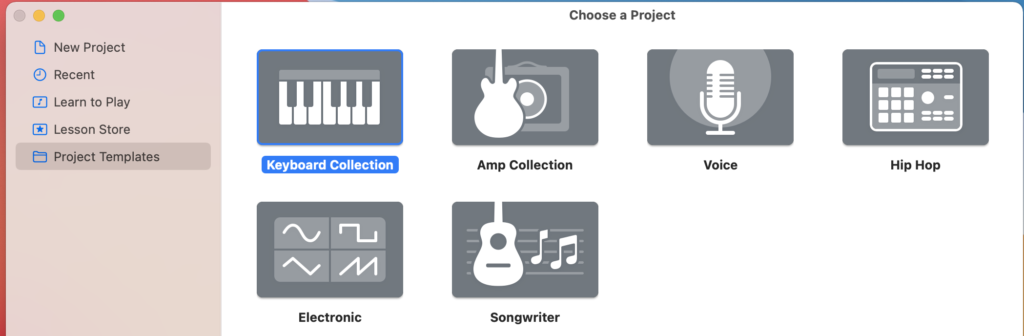
Open Garage Band. If this is not your first time working in this software, by default it opens your most recent project. Otherwise, it asks if you want to open an Empty Project. Click on the left for Project Templates. Pick the option with the microphone image for vocals.
When the project opens, look at the top of your screen. You’ll see a bar that looks like an LED console screen. By default, Garage Band displays time in music notation. You don’t need that. Click the down arrow in the right of that box, and select “Time.”
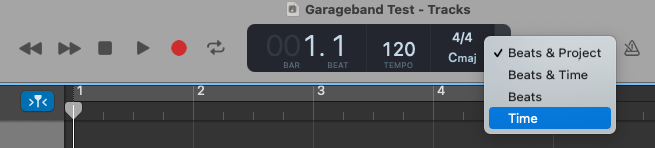
To the left of that, there’s a little box that says “1234,” and a picture of a metronome. Make sure that both of those are turned off. You might not be able to hear the metronome ticking in your headphones, but it can be heard when you record a podcast in GarageBand. Don’t ask me how I know. Mistakes are good teachers.
Save Early, Save Often
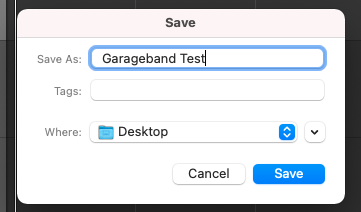
Go to “File,” click “Save As,” name your file, and choose where you want to save it. Remember, back up early, back up often.
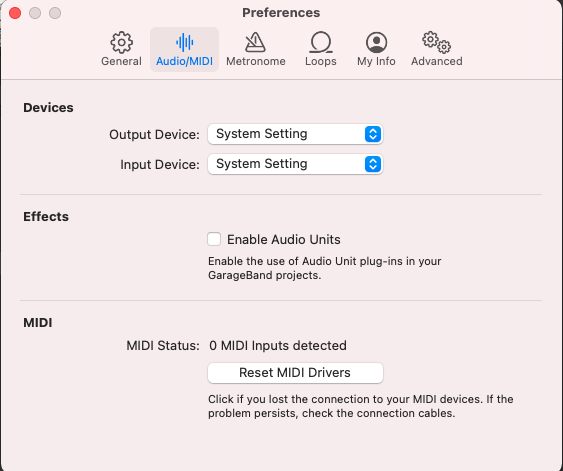
Hover over the word “GarageBand,” and select “preferences.” Click where it says, “Audio/Midi. ” For your input device, select your microphone. For your output device, select your headphones.
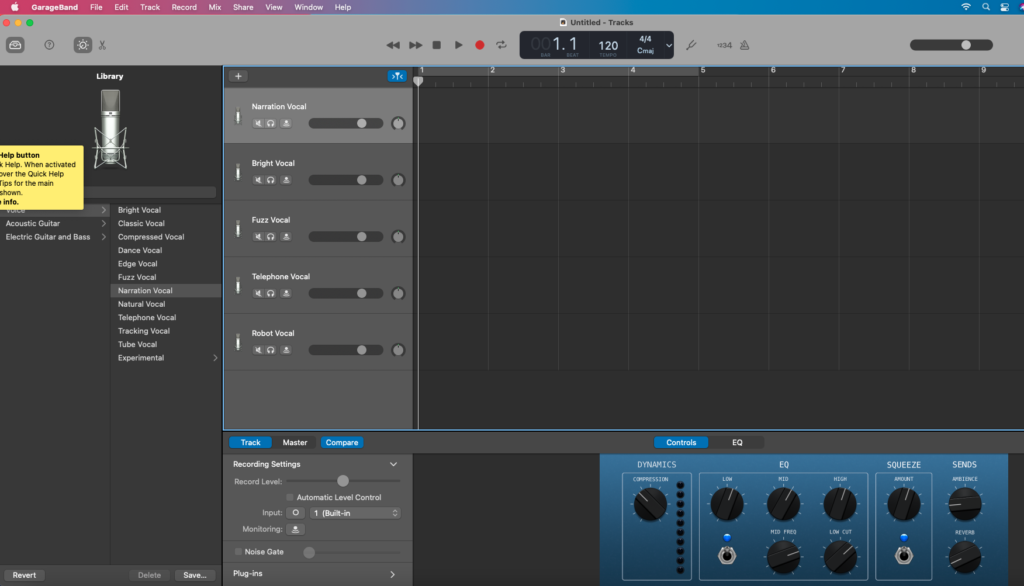
GarageBand’s Library offers different kinds of vocal templates, such as Narration Vocal, Bright Vocal, Fuzz Vocal, and so on. Each has a different combination of pre-set attributes, to make your voice sound a particular way. Play with the different vocal styles, and find the one that’s right for your podcast. Hint: it’s probably not Fuzz Vocal.
You can delete additional tracks by holding down control, clicking on the track you don’t need, and selecting “delete.” You can add tracks by clicking on “Track” and scrolling down to “New Track.”
Click the round red icon at the top to record, and start talking. I can’t tell you how many people have forgotten to hit record when it was go time.
When you’re finished talking, click the square to stop. You can click the icon that looks like an arrow pointing left into an upright line to go back to the beginning of your project.
You can also click and drag other sound files, such as music or sound effects, into the project timeline, and move them around. In fact, if you click and drag an .mp3 file into GarageBand, it’ll make its own track.
How to Edit a Podcast in Garageband
The Library is the first menu that shows up, by default. In this case, you want the Editing menu. In the upper left-hand corner of the screen, you’ll see four icons. Click on the scissors to open the Editing menu.

Select the track you want to edit. If you have multiple tracks, you can make a track the only one that you hear by clicking on the one that looks like a pair of headphones. Or, you can mute a track by clicking on the icon that looks like a megaphone with a line through it.
Music and Narration
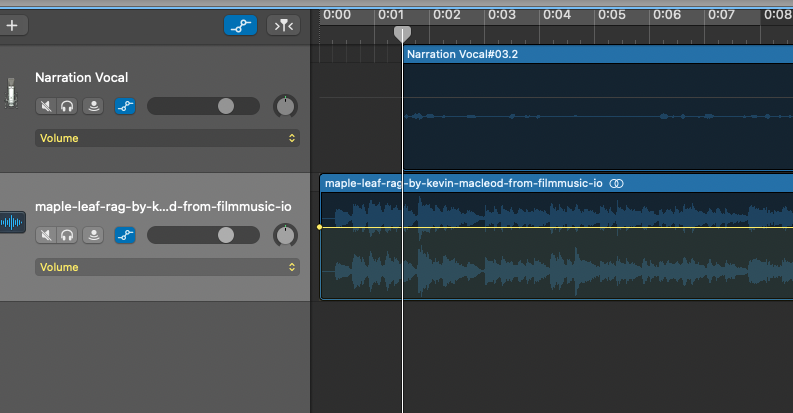
Here’ I’ve got some sample narration on the top track, and some music on the second. I know better than to use copyrighted music. We have an amazing free music library for podcasters. I’m a sucker for ragtime, so I used a rendition of The Maple Leaf Rag by Kevin McLeod at incompetech.com. The music is grey, because I liked the mute button on that track. I’m going to edit the narration, which is blue.
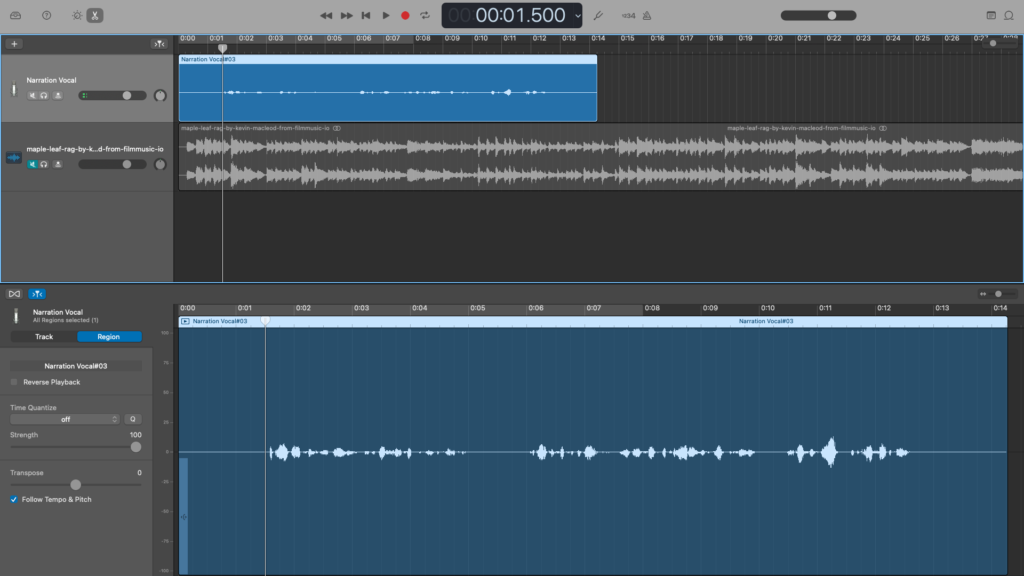
Let’s say you want to cut. In the sample here, I’ve got some dead air at the beginning and end of the narration track, so I’m going to cut it out. You can see, above, that I put the playhead where I want the cut to happen.
In the (bottom) Editing window, I’m going to hover my cursor over the playhead, below the waveform line. It’ll make a little cross icon. Click, and it’s cut. Then, I can highlight the region I want to discard and hit the delete key.
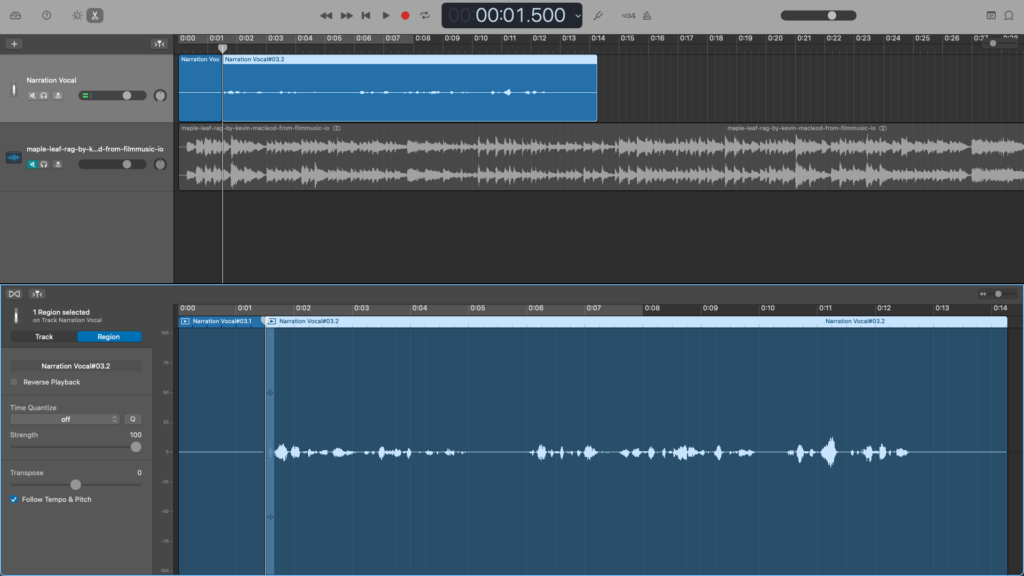
Voilá. Don’t forget, Command + Z (the undo function) is your friend if you make a mistake.
How to Mix Audio in GarageBand Podcast Production
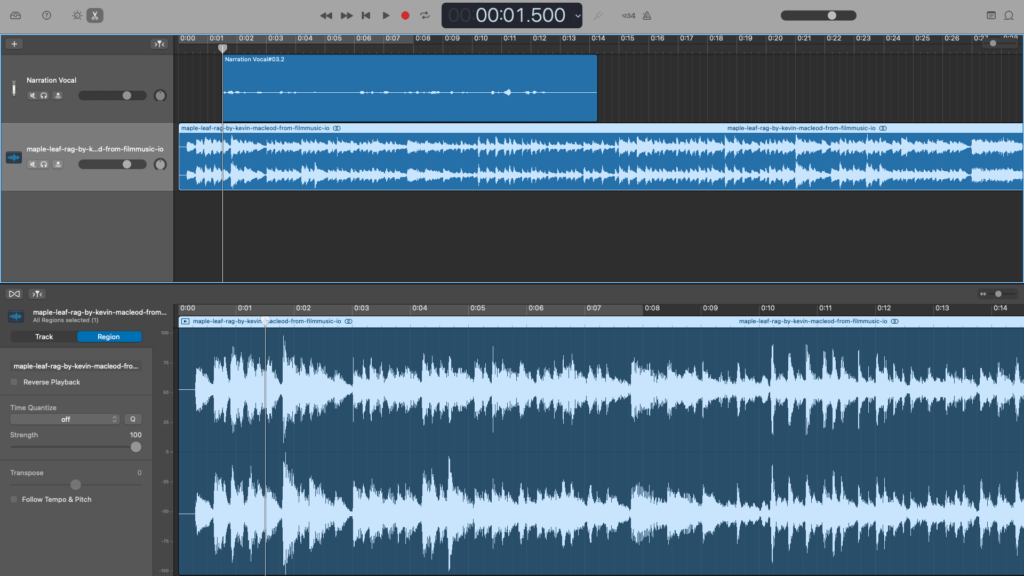
You can see by the comparative size of the waveforms that the music file I added is really loud. There’s no way the audience can hear me over the music. Here’s how I can duck the music under my narration.
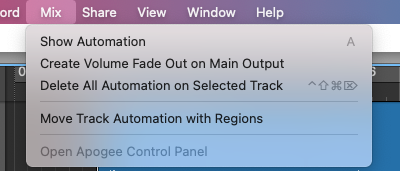
Go up to the top, to “Mix, and then “Show Automation.”
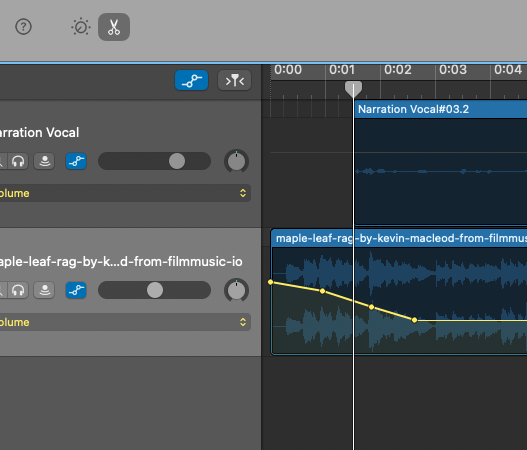
The track should say, “Volume.” Click on the region you want to adjust. A yellow horizontal line appears. Click on it to make points for the volume level to match.
Then, drag each point down slightly. The volume of that track will match the points.
You can probably figure out how I got the music to come back up.

Before I go any further, please know that there are dozens of tutorials that can explain the intricacies of sound editing for GarageBand podcast production. Most of them focus on one element or another, such as editing or EQ. There are more features than I could fit into one article.
Saving and Sharing Your Podcast Episode in GarageBand
Again, this software is designed with musicians in mind. Many publish their music to Apple Music, or to SoundCloud. With GarageBand podcast production, though, you want to use a media host. It can’t send your podcast file directly to your host. So, you need to save the file locally.
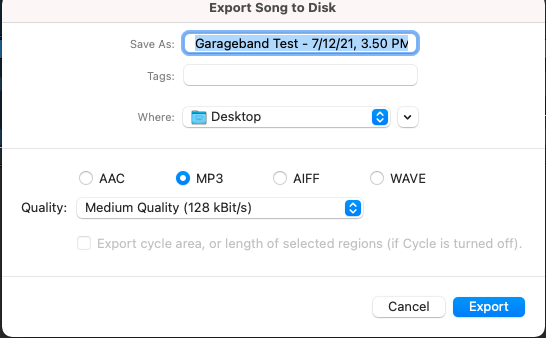
Take your cursor up to Share, and select Export To Disk.
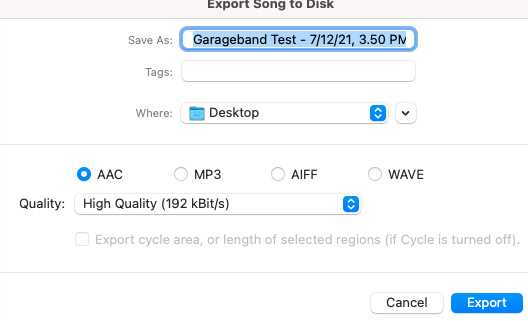
Select the location where you want to save your podcast file,, the file format, and the bitrate. In this example, I picked the Desktop, mp3, and 128 kbps respectively.
After this, I’d upload the file to my media host, and let it publish to directories.

The process is only slightly different if you’re doing this on mobile devices.
Garageband for Podcast Production
No two podcasters are alike. I’m a writer, not a sound editor. On the other hand, Garageband is fun. But, if I spend all my time concentrating on sound design, I won’t be able to spend time planning, scripting, or promoting my podcast.
Only you know what’s right for you and your podcast. if you want to try out sound design, GarageBand is an excellent gateway choice. Or, if you want to focus on your content and engagement, you should definitely try Alitu. Not only can Alitu help you record, edit, and polish, it’ll store your finished files, upload them to a media host, and publish your podcast episodes to directories.